Tuesday, July 31, 2012

The Keeping Room: Simplify

"Learn to let go. That is the key to happiness." 

Well, I'm trying--to let go--to simplify. . . .We just have too much stuff. . . .and that's the bottom line. . . .So, as we move the newly painted cabinets into the keeping room, I've decided to clear out all that excess "stuff" that's just taking up room and doesn't contribute at all to my life.


 My intentions are good. . . . yet. . . .It is hard to clear out. . . .We're told if we haven't used it in a year, get rid of it. . . .but, "I might need it later". . . .. . .I have, in the past, regretted throwing out several items. . . .


It's comforting to read that others have the same problem. . . . Robyn Griggs Lawrence sums it up the best. . . . "Modern Americans face more choices in one trip to the grocery store than our grandparents faced in their entire lifetimes. All that freedom of choice is reflected in most of our homes, littered with more furnishings and gadgets than we need or want. Stuff is a major impediment. . . .and it's one of the hardest ones to break through. . . ."
Her advise is, don't try to declutter all at once. . . .take it in steps. . . .so that's what I'm doing. . . .
I have no problem getting rid of new items I don't use. . . .
It's the old stuff that's so hard. . . .

Robyn suggests we place our cast offs in boxes marked. . . .Give Away. . . .
Throw Away. . . . Hold for a Year. . . .

Not enough boxes for me. . . .

I'm adding a few more. . . .For the Historic District. . . .For Family and Friends. . . .To Sell Online. . . .That's what?. . . . Six boxes? . . . Might be too many. . . .But, it sure makes me feel better. . . .Now, I can really get to work. . . .

My collection of cake plates and other glassware has gotten out of hand. . . .time to clean out the ones I'll never use and. . . .

sell online this fall and winter, or. . . .

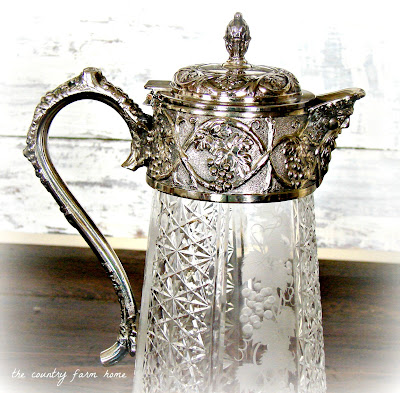
find a new home for it. . . .Such as this lead crystal and silver pitcher. . . .Isn't it beautiful?. . . .It was my Grandmother Duncan's. . . .then my Mom's. . . .and then mine. . . .It's a beautiful piece that I wanted it to go to one of my nephews and his wife some day. . . .Guess what. . . .Today's the day!

 
 Lucky couple. . . .

I have boxes of white dishes for our everyday use. . . .I've never been able to pass up white. . . .but, it's just too much. . . .so, a "White Sale" is coming ladies. . . .

I AM making a little headway. . . .


"Tis a gift to be simple,
Tis a gift to be free. . . ."

I'm trying. . . .


Monday, July 30, 2012

Barn Charm: The Moody Horse Barn & Shelters

Just down the road from us. . . .

Newer construction, but definitely charming. . . .

Built to house and shelter the Moody horses and colts. . . . .


The horses were sold in the spring of 2012. . . .


If you love old barns, visit Barn Charm every Monday. . .

Image and video hosting by TinyPic

Sunday, July 29, 2012

Pearls, Lace and Overalls

Jacqueline, who is better known as The Darling Homemaker, loves to wear vintage clothing--as do I. Her blog is on my Blog List at the right, but I didn't want you to miss this post. It's such a uniquely feminine way to dress up overalls. And, she really does look "darling". I had to include this post in The Country Farm Home. It's a look that definitely fits the farm and historic district.

Jacqueline is  also wearing several vintage accessories--but I won't give it all away. Hop on over to The Darling Homemaker and read about it for yourself. And, be sure to read her other posts, too. She has some real vintage style there.

And, if you'd like another idea or two on dressing up overalls, check out: 

Friday, July 27, 2012

Corn Garlands for Fall

Are you ready for fall?
I know it's only July, but it won't be long until corn will be available for your fall decorating. So, I thought I'd take a few minutes and write a short post on how to craft a corn garland. I confess that these are not my photos or my design. They came from the November 1998 issue of Country Living magazine. But, I have made the garlands in the past, and they turn out beautiful. They also store very well, if you keep them in a dry, rodent free place.

You'll need dried ears of corn (I like Indian corn), jute twine, and raffia. Cut two pieces of the twine to the approximate length you want your finished garland, adding a little more for knotting and the end loops. Knot the two lengths together every 8-9". Tie loops at the end for hanging.

Cut 18-20" lengths of raffia. Group together 3 ears of corn and tie, using 2 or 3 strands of raffia about midway down the husks. Don't trim the raffia.

When you've made a number of bundles, begin adding them to the twine lengths. Slide one ear of the corn bundle through the knotted twine so that the other two ears hang on opposite sides of each strand and the tied raffia rests on the twine. Tie the raffia ends to the twine. Hang the garland and trim the raffia to the desired length.

That's all there is to it!
These garlands can be crafted any length and/or hung vertically. One year I made a garland that we attached around the door frame. The possibilities are endless. . . .

So. . . .get those corn ears together and start shucking and crafting. . . .fall is not far away. . . .


I'm sharing this post with: * Rural Thursday * Tweak It Tuesday

Thursday, July 26, 2012

The Art of Thrifting

Thrifting is part art--knowing where to go and when--and a lot luck--being at the right place at the right time.

John and I were in Jackson, Tennessee the last two days.  He had a couple of appointments. I went to shop--at thrift stores. Over the past few years, we've discovered numerous thrifty places in Jackson. There are three Goodwill stores and two other thrift stores that we frequent. That's pointer #1--scout out and research available stores.

Pointer #2, know store schedules. We planned our trip around the 30% off Tuesdays at one store and the 99 cent and half off Wednesdays at the Goodwills.

As for pointer #3, if it's possible, scout out items the day before the sale. If it's an item you especially like, you might want to go ahead and buy it. Even at full price, thrift stores are always a bargain. Once you find the ones you like, decide which store you'll visit first the next day.
Also, I like to decide which items are important to me, so I go to that department first.
And, remember to have a list, or a general idea, of the important items needed, sizes, colors. It's very easy to get side-tracked.

I'd say pointer #4 has to be, don't get stressed. Have fun. If someone gets there before you and you miss out on a purchase, don't sweat it. You'll find another one someday--maybe cheaper. It's all for fun. . .
Want to see a few of our treasures?

Cute Caged Rabbits  3.25 
Baskets 1.00 each

Basket of Roses 2.50
Two Needlepoint Pieces 2.00 each

Vintage Light Fixture 3.00
Bicycle Basket 2.00
Two Vintage Pillowcases (on right)  1.00

Blue Transferware Turkey Platter 15.00
Blue Willow Bowl  .35
Transferware Plate 2.50

Miscellaneous Dishes .35-.99 each

Vintage Jewelry Box 2.00
Vintage Jewelry .75-2.00
Vintage Velvet Purse 2.00
Crocheted Potholders 1.00
 Crocheted Doily .25
Vintage Pattern .40

Vintage Handbag  B&W .99
Small Brown Vintage Bag (1930s) 3.00
Vintage Snake Skin Bag 2.50
Vintage Type Shoes .99-2.50

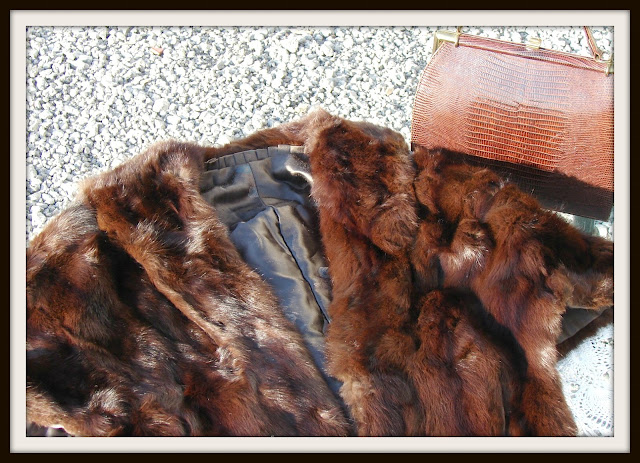
Vintage Fur 12.00

Vintage Wool Jacket .99
Vintage White Blouse .99
Vintage Sailor Dress .99

Vintage Ties  .99 each
Amish Straw Hat  5.50

Wheeler & Wilson Treadle Sewing Machine  20.00

Glass and Metal Coffee Table  12.00

We also took advantage of the .99 clothing sale and bought a number of those items for the grandchildren and for us, as well as a few supplies for the household. 

It was a fun two days of thrifting--and exhausting. But, don't you agree, we found some real treasures? And, had fun at the same time. . .
You'll be seeing most of these items in coming posts, as I decorate, repurpose, paint, and craft . . . So, be watching for them. . . .

Sharing this week with: * Frugal Days, Sustainable Ways * Homestead Barn Hop * Simple and Sweet Fridays *Vintage Inspiration * Feathered Nest Friday * Show and Tell Friday

Monday, July 23, 2012

1930s Green Kitchen Tins and Other Things


It's "time" to move a few things out of the kitchen/keeping room to make way for the change over. One more quick look--then they're gone. Oh, don't worry--they're not going far--just to the back porch. . . . .

One thing nice about painting our walls a soft, creamy color--and the kitchen cabinets a classic white--is the opportunity to change easily into a different look and style. The neutral colors make a wonderful backdrop.

Since the historic district is set ca 1938 and we, at one time, allowed special visitors to tour our house, I decorated in the appropriate style of a 1930s cottage kitchen. Green was the accent color, with splashes of red. I collected many items in green, including the ones you see here. They were all well-used, rusty in places--but, with definite character. I have loved and enjoyed them all. . . .

I used the bread box for flowers and greenery--and for stalks of cotton bolls, when flowers weren't available. Rarely was there a homemade treat under the cake cover. More often than not, it hid a package of cookies or box of crackers or a stack of  paper plates. I hid homemade jams--and John's peanut butter--in the smaller bread box.

I love this sunbonnet lady--reminiscent of the sunbonnet quilts popular in the 30s. The tin may have originally been purchased with cookies or crackers in it. One of the marketing tools of that time. . . .

Isn't this little shelf cute? It's the one piece I based my 1930s kitchen colors on. It only measures 7 1/4" x 11". It's chippy and painted on some type of particle board--but it is vintage. And, the good news is, I've decided to sell it. . . . Only $5.00, plus $3.99 shipping! If you're interested, email me. . . .SOLD!!!!

The frogs were for fun. They showed up in wooden buckets or as part of a vignette or anywhere that might bring a smile to someone. Why frogs? Well, there's a story behind it, concerning a cat we had when we first moved here and his night out eating "frog legs". But, I won't go into that tale right now. Let me just say, we had--and have--numerous green frogs at the farm. They sing to us at night, cling to our windows at the strangest times, and perplex our house cat, Boo, to no end.  We like having them around. They eat spiders and bugs and mosquitoes--and the kids love catching and playing with them. It's a farm thing. . . .

Now, it's time for a change. I'm clearing everything out and starting with a blank slate. I'm afraid these "green things" are the first to go. I can re-purpose them as storage for garden seeds and supplies, to hide nails and hammer,  and maybe for drying flowers.  I'll still enjoy them----on the back porch. . . .

Saturday, July 21, 2012

For the Keeping Room: Folk Painting on an Old Barn Door

I've decided to do a few posts along the way about "parts and pieces" I plan to use in the keeping room project. I'm beginning to find more and more to choose from, as I make my way through the storage shed and the boxes--lots of boxes. Some things I haven't seen in many years. Other things I'd totally forgotten I had. And, several things I couldn't believe I kept. . .

This  folk art painting on a barn door has always been a keeper. It was painted by a young artist at the Memphis (TN) Flea Market in 1975. I remember he wanted $25 for the painting--and I was as poor as a church mouse--but, then again, so was he. Every weekend flea market, I'd check to see if he still had it. After about six weeks of this, we struck a deal. I paid him $12.50 in cash and worked at the market the next four weekends to pay off the rest. We were both happy. . .

I've never been without it since, although it's been buried in storage for the last eight years. Not only is it a nice piece of folk art, it also makes me smile, bringing memories of younger days and lessons learned. It has hung in a family room, a dining room, a living room, a bedroom, and even a bathroom.

When I unpacked it this week--and smiled--I noticed 
that the painting has all the colors of my palette:

Yep. It definitely has to be used in the keeping room. Don't you agree?


Folk Art Painting: 1975
 Artist:  M. Pearl
Measures 24" x 34"

Want to read more about this journey? See:  Keeping Room Redo Update -- Plans for the Keeping Room -- 1930s Keeping Room

Thursday, July 19, 2012

Making Amish Peach Jam


John came home Sunday with a bag full of beautiful free peaches.  We usually visit a local orchard where we purchase culls for $5-$7 per box. They're perfect for making jam. I had it on my "to do" list--but I sure like "free" better!

His timing couldn't have been more perfect, because just last week on the Amish Stories blog, there was a recipe for Peach Jam that I wanted to try. It was made with Jello instead of fruit pectin. I always have Jello around, and fruit pectin has gotten so expensive.

I sat aside Tuesday to make John some Peach Jam. . . .


Recipe for Peach Jam  
as featured at Amish Stories

Ingredients:
6 cups peaches, mashed
6 cups white sugar
2 cups crushed pineapple
6 oz orange Jello

My method:
Peel peaches. . . .To keep them from turning brown while you do all that peeling, place them in a pan of water to which 2 T vinegar per gallon of water has been added. . . .Don't worry. . . .You won't taste the vinegar in the jam. . . .Then when all are peeled, remove peaches from the water and mash. . . . .You can use a food processor, a blender, a mixer, or a potato masher. . . . .I didn't mash them to a pulp because John loves chunks of fruit in his jam. . . .

Combine mashed peaches, sugar, and pineapple (I drained mine) in a heavy pot, and. . .
Bring to a boil. . .Cook 20 minutes (or til it begins to thicken and peaches are cooked through). . . . Add the Jello. . . .I continued to cook the mixture for about 2 more minutes to be sure the Jello had dissolved. . . .
This is the fun part. . . .I love the canning process. . . .I heat my jars in the oven at it's lowest setting (about 100 degrees). . . .then I heat the canning lids in hot--but not boiling--water on the stove. . . .I also sterilize the utensils, Pyrex measuring cup, and funnel for a few minutes in the oven. . . .

Take a jar from the oven and place it in a small pan with a folded paper towel on the inside bottom. . . .Mom always did this. . . .It makes sense because sometimes a jar will break. . . . .Instead of cleaning up a cabinet top and floor, all you have to do is empty the pan. . . .Wasn't she smart? 

Fill the jar with jam, using your Pyrex measuring cup and the funnel. . . .Wipe rim of the jar with a damp, clean cloth. . . .Take a lid from the hot water and place on top of the jar. . . .Seal tight with a ring. . . .Sometimes I turn them upside down for just a few minutes to be sure the seal is warm enough. . . .then back upright. . . .

If you want to process them in a water bath, you can.  . . .Process for 10 minutes. . . .I didn't process mine. . . . John eats them so fast, they never stay around a year. . . .The Amish recipe says you can do either one. .

Please note: There is some concern that since Jello is made from animal products, not processing this jam might not be safe. Another alternative: freezer jam!


Don't remove the rings for at least 24 hours. . . .Check seals. . . .and store in a cool dry place. . . .

This recipe was very easy. . . .It took me less than two hours from start to finish. . . .
but, the real test is--will John like it?

Results of John's Taste Test:
Well, there were no words. His eyes just rolled back. . . . and he continued licking the spoon after any jam was long gone. . . .Please do make a note that the jam is not firm. . . .It's more the consistency of freezer jam. . . .but, John says it's delicious as it is and not to touch it. . . .as long as he's happy. . . . so am I. . . .


Sharing this Post with: * Rural Thursday  * Homestead Barn Hop
Related Posts Plugin for WordPress, Blogger...